How to Trim Your Cat's Nails Without Getting Scratched
Reviewed against AKC, ASPCA, and AVMA guidance. Read our editorial standards.
Last updated:
- Trim only the sharp tip — cut 2mm before the pink quick to avoid pain and bleeding
- Sharp, guillotine-style or scissor-style clippers designed for cats work best
- Start by handling your cat's paws regularly before ever introducing clippers
- Most cats only need nail trims every 2-3 weeks
- If your cat won't tolerate trimming, a vet or groomer can do it safely for $10-20
Your cat just shredded the corner of your couch for the third time this month, and your forearms look like you lost a fight with a briar patch. You know you should trim her nails, but every time you try, she turns into a furry blender of teeth and claws. You're not alone — nail trimming is one of the most dreaded grooming tasks among cat owners.
The good news is that with the right technique, desensitization, and a healthy respect for your cat's tolerance limits, nail trimming doesn't have to be a battle. Most cats can learn to accept — or at least tolerate — regular trims.
Key Takeaways
This matters because consistency gives your pet a sense of security and predictability, which reduces stress-related behaviors.
For example, something as simple as a consistent feeding schedule — same times, same place, same routine — can reduce anxiety-related behaviors in both dogs and cats.
- Trim only the sharp tip — cut 2mm before the pink quick to avoid pain and bleeding
- Sharp, guillotine-style or scissor-style clippers designed for cats work best
- Start by handling your cat's paws regularly before ever introducing clippers
- Most cats only need nail trims every 2-3 weeks
- If your cat won't tolerate trimming, a vet or groomer can do it safely for $10-20
Why Nail Trimming Is Necessary
Indoor cats don't wear down their nails naturally the way outdoor cats do on rough surfaces. Without trimming, indoor cat nails continue growing in a curve and can eventually circle back into the paw pad, causing pain and infection. This is particularly common in senior cats and Persian cats with less active lifestyles.
Even before they grow into the pad, overgrown nails cause problems:
For instance, many new pet owners don't realize that regular nail trimming isn't just cosmetic — overgrown nails can cause pain, alter gait, and lead to joint problems over time.
- Snagging on fabric — carpet, upholstery, clothing, blankets. A stuck nail can tear, causing bleeding and pain.
- Painful scratching — sharp nails make normal kneading, play, and jumping more damaging to you and your furniture.
- Difficulty retracting — excessively long nails can't fully retract into the sheaths, making walking uncomfortable.
Equipment You'll Need
Understanding this is important because small daily habits compound over time — they're the foundation of a healthy, happy pet.
Scissor-style clippers are the most popular for cats. They look like small scissors with curved blades designed to wrap around the nail. Easy to control and suitable for most nail thicknesses.
Guillotine-style clippers have a hole through which you insert the nail tip, then squeeze to cut. Some people find these easier for positioning, but the blade dulls quickly and needs replacement.
Human nail clippers work surprisingly well for kittens and small cats with thin nails. They provide precise control.
Styptic powder or cornstarch — keep this within reach in case you nick the quick (blood vessel inside the nail). Applying styptic powder stops bleeding within seconds.
In practice, spending just 10 minutes a day on focused one-on-one time (not just being in the same room, but actively engaging) makes a measurable difference in your pet's behavior and bond with you.
Treats — high-value treats (small pieces of cooked chicken, commercial cat treats, lickable tubes) are essential for making the experience positive.
Understanding Nail Anatomy
Before you cut anything, understand what you're looking at.
Cat nails have two key parts:
The clear/white portion — this is dead nail. It's safe to cut.
The quick (pink portion) — this is the blood vessel and nerve inside the nail. Cutting the quick causes pain and bleeding. In cats with light-colored nails, the quick is visible as a pink line inside the nail. In cats with dark nails, you'll need to estimate by trimming conservatively.
The rule: Only trim the sharp tip — the last 1–2 millimeters of the nail. You're removing the hook, not reshaping the entire nail. It's better to trim too little than too much.
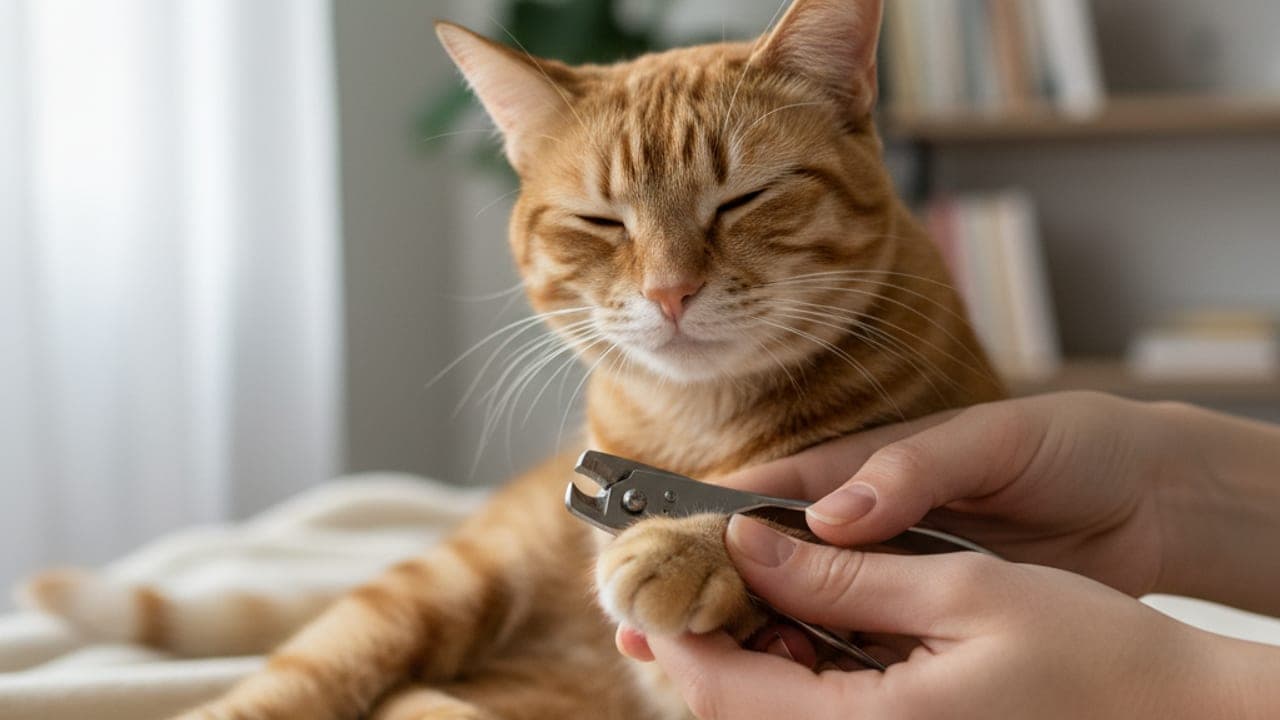
Step-by-Step Technique
Step 1: Position
Choose a time when your cat is relaxed — after a meal or during a calm period. Sit your cat on your lap facing away from you, or on a table at a comfortable height.
For Maine Coons and other large cats, having a second person gently hold the cat can be helpful, but many cats do better with a single handler in a calm environment.
Step 2: Extend the Nail
Hold your cat's paw gently. Using your thumb on the pad and your index finger on top of the toe, gently squeeze the toe. The nail will extend forward and become fully visible.
Don't squeeze hard — gentle pressure is sufficient. If your cat pulls away, let her. Forcing the paw creates negative associations.
Step 3: Identify the Quick
Look at the extended nail. If it's light-colored, you'll see the pink quick clearly — cut well below it. If it's dark, trim only the sharp, curved tip (1–2mm).
Step 4: Cut the Tip
Position the clipper perpendicular to the nail (not at an angle). In one smooth motion, clip the sharp tip. You should hear a clean click, not a crunch.
Step 5: Treat and Praise
Immediately offer a treat and verbal praise. Even if you only trimmed one nail, that's a success. Release your cat if she wants to leave.
The Gradual Approach for Reluctant Cats
If your cat won't let you near her paws, you need to desensitize before attempting to trim. This process takes days to weeks — patience is non-negotiable.
Day 1–3: Touch your cat's paws casually during petting sessions. Treat immediately after each paw touch. Don't squeeze or extend nails. Just touch.
Day 4–7: Hold the paw gently for 1–2 seconds. Treat. If she pulls away, don't pursue. Try again later.
Day 8–14: Gently press the pad to extend one nail. Treat. Don't clip yet. Just let her experience the extension and the treat.
Day 15–21: Touch the clipper to one extended nail without cutting. Click the clipper near (not on) the nail. Treat.
Day 21+: Trim one nail. Treat generously. Stop. If she accepts it, try a second nail the next day. Build up gradually.
This sounds tedious, but it creates a cat who tolerates nail trims for life. A few weeks of desensitization prevents years of wrestling matches.
How Often to Trim
Front claws: Every 2–3 weeks. Front nails grow faster and are used more aggressively for scratching.
Back claws: Every 3–4 weeks. Back nails grow more slowly and are usually less sharp.
Senior cats: May need more frequent trimming because they scratch less and nails become thicker with age.
Kittens: Begin handling paws and introducing the clipper early (8–10 weeks) even before nails need trimming. Early positive exposure creates lifelong tolerance.
Handling the Difficult Cat
Some cats genuinely cannot tolerate nail trims despite gradual desensitization. Options:
The burrito method. Wrap your cat snugly in a towel, leaving one paw exposed at a time. This prevents flailing and scratching while providing the security of compression. Some cats calm down significantly when swaddled.
Trim during sleep. Some cats are deep sleepers. With gentle handling, you can trim 2–3 nails while a sleeping cat barely stirs. Multiple sessions of 2–3 nails per nap add up quickly.
Two-person approach. One person holds and distracts (treats, lickable paste on a plate); the other trims. Coordination is key — the holder controls the body while the trimmer works quickly.
Professional help. Veterinarians and groomers trim cat nails routinely. If home trimming causes extreme stress for both you and your cat, professional trimming every 3–4 weeks is a perfectly valid solution. Most vets charge $15–$25 for a nail trim.
Sedation for extreme cases. Cats with severe handling anxiety may need mild sedation (gabapentin) before nail trims. Your vet can prescribe this for at-home use before the appointment or home trim session.
What If You Cut the Quick?
Don't panic. It happens to everyone, including veterinarians.
- Apply styptic powder or cornstarch directly to the bleeding nail tip with firm pressure.
- Hold for 10–15 seconds.
- Bleeding should stop within 30–60 seconds.
- If bleeding continues beyond 5 minutes, contact your vet.
Your cat will forgive you faster than you'll forgive yourself. Offer a high-value treat, end the session, and try again another day.
Alternatives to Nail Trimming
Scratching posts and pads help maintain nail length naturally. Offer a variety of textures (sisal rope, cardboard, carpet) in both vertical and horizontal orientations. Place scratching surfaces near the areas your cat already scratches.
Nail caps (Soft Paws or similar brands) are small plastic covers glued over each nail. They prevent scratching damage and last 4–6 weeks before falling off naturally as the nail grows. Application requires the same paw-handling skills as trimming — or your vet can apply them.
Never declaw. Declawing (onychectomy) is the amputation of the last bone of each toe. It causes chronic pain, behavioral changes, and is banned in many countries and US cities. Regular nail trimming, scratching posts, and nail caps are humane alternatives.
For more on reading your cat's comfort level during grooming, see our cat body language guide.
Founder Insight: What Most People Get Wrong
From experience working with thousands of pet owners: the biggest mistake is overcomplicating care routines. Your pet doesn't need the most expensive food, the trendiest supplements, or a Pinterest-perfect setup. What they need is consistency — regular meals, predictable routines, daily attention, and a safe environment. Start with the basics, do them well, and build from there.
FAQ
My cat bites when I try to trim nails. What should I do?
Biting during nail trims means your cat has exceeded her tolerance threshold. You're either moving too fast in the desensitization process or trying to trim too many nails in one session. Go back to the paw-touching stage and rebuild tolerance gradually. One nail per session is perfectly fine. The burrito wrap can also prevent biting while you work.
Can I use human nail clippers on my cat?
Yes, especially for kittens and cats with thin nails. Position the human clipper so it cuts the nail from the side (not top to bottom) for best results. Many cat owners prefer human clippers because they're familiar and provide good control. Switch to pet-specific clippers for older cats with thicker nails.
How do I trim a cat's dew claws?
Dew claws (the "thumb" nails on the inner side of the front paws) need trimming too — they don't contact the ground and don't wear down at all. They're the most common nails to grow into the pad if neglected. Extend the dew claw by pressing the corresponding pad, and trim just the tip.
Should I file my cat's nails after clipping?
It's not necessary for most cats. If you notice rough edges that snag on fabric, a gentle pass with a cat nail file can smooth them. Most cats tolerate filing less well than clipping, so only add this step if truly needed.
At what age should I start trimming my kitten's nails?
Begin paw handling from the first week home (usually 8–10 weeks). Start actual trimming around 10–12 weeks, using small human nail clippers or kitten-sized pet clippers. Kitten nails are thin and sharp, and early positive experiences with trimming create a cat who accepts it as a normal part of life.
Mr Pet Lover Team
The Mr Pet Lover team is dedicated to providing warm, accurate, and practical pet care advice backed by veterinary research and real-world experience.
Related Articles

The Real Lifetime Cost of Owning a Dog (A 12-Year Itemized Budget)
What a dog actually costs over its whole life — itemized year-by-year by size class, separating one-time, recurring, and likely-once expenses into a real 12-year total.

Emergency Vet Costs: What 12 Common Emergencies Actually Cost (and How to Prepare)
What the 12 most common pet emergencies actually cost, how big an emergency fund needs to be, and what insurance covers vs. not — so one bad night doesn't become debt.

Is Pet Insurance Worth It in 2026? A Real-Numbers Decision Guide
Pet insurance averages $62/mo for dogs and $32 for cats in 2026 — but 'worth it' is arithmetic, not affection. A real-numbers insure-vs-self-fund decision rule with worked examples.